Attention spans are at an all-time low. Especially for YouTubers, your audiences are bombarded with plenty of other options immediately in the sidebar or just a search away. With all of these options to leave, it’s important to grab their attention within the first few seconds. One of the best—and easiest—ways to pique their interest and show them you’ve made a quality video from the start is by making an amazing video intro.
How and When to Use Intro Videos
The purpose of an intro video is to set the tone or set up your production or presentation. Whether you’re leading into a feature-length video or setting the tone for a speech, you’ll want to use an intro video to make a strong first impression.
Intro videos can take on a variety of styles and looks. Here are a few key stylistic categories:
- Logo Reveal – some videos in the corporate world really focus on showcasing your branding by showing the logo and other key brand assets as the primary focus
- Typographic Intro – sometimes, beautiful text with fancy animations is more than enough for an intro video. Typographic videos can be an ideal minimalist intro video that holds your audience’s attention as they read along.
- Hype Intro – a hype intro might combine lots of different photos, video clips, and audio to make an instant impact.
Learn How to Make an Intro Video by Starting with an After Effects Template
Adobe After Effects is an incredible app, but it isn’t the easiest app to learn or use. Making an animated intro video is made simpler with After Effects templates that were made and set up by professional animators.
In this tutorial, you’ll see me customize and work with a simple, opening template from the Storyblocks library. We’ll give you access to this template for free so you can follow along with the tutorial!
Just make sure you know that by downloading this content, you agree that you will only use this content for personal use to practice your skills, and not for any other purpose such as a commercial purpose, nor will you distribute this content to anyone.
When you’re looking at an After Effects template, try to see the potential of a video once you’ve added your fonts, colors, and assets rather than the exact template. Even if you’re using the template for a completely different purpose like a corporate intro video, the animations in a slideshow might work perfectly once you’ve added your creative touch.
In a complex app like After Effects, it helps to watch someone walk through the steps to see how to work in the app. We’ll provide the free AE template and other assets so you can easily follow along. Don’t have After Effects? Get a free trial.
Follow along step-by-step with the rest of the tutorial to see an illustrated customization guide. My steps will be specific to the Simple Opener project, but many of the techniques can be used with practically any After Effects project.
1. Download the Template
Storyblocks subscribers have access to thousands of After Effects templates that have been set up to be customized by professional video animators. The first step is to choose a template and download it to get started. If you’ve downloaded your free template from the above form, then you’re all set.
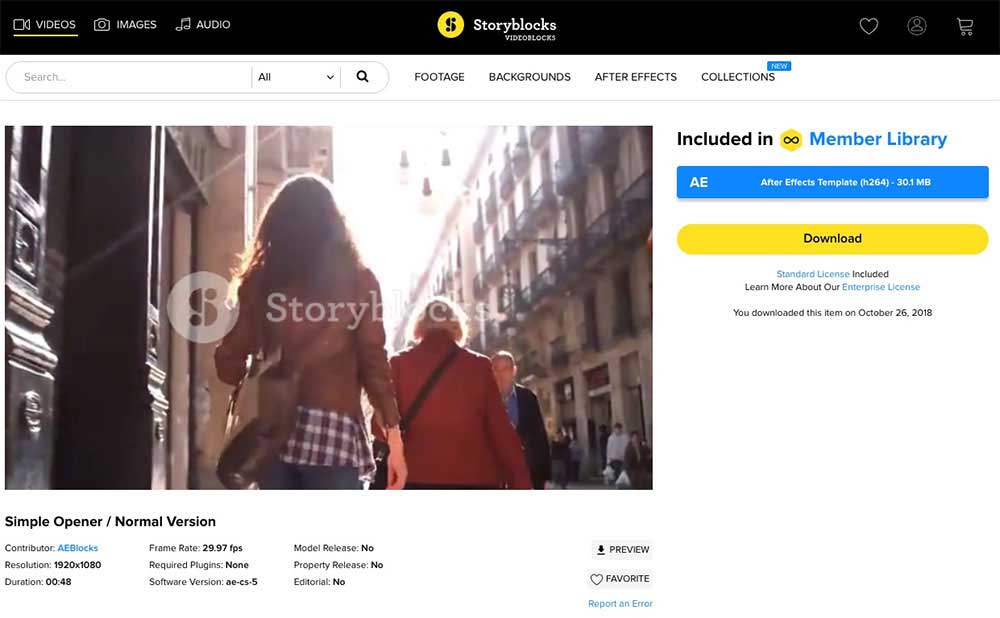
Inside the download package, you’ll find several files. Inside the “After Effects project file” folder, you’ll find a “.aep” file—this is the After Effects project file.
2. Open the Template in Adobe After Effects
Double-click on the Simple Opener (48-second version).aep file. It should open up in After Effects in just a few seconds. You might see a few “warnings” including one about missing fonts in some After Effects projects. This project uses Gobold, and you can download and install it for free.

Go to File > Save As to save your project as a separate file so that you can jump back to the original project file if you want to start over.
3. Add Your Stock Imagery and Footage
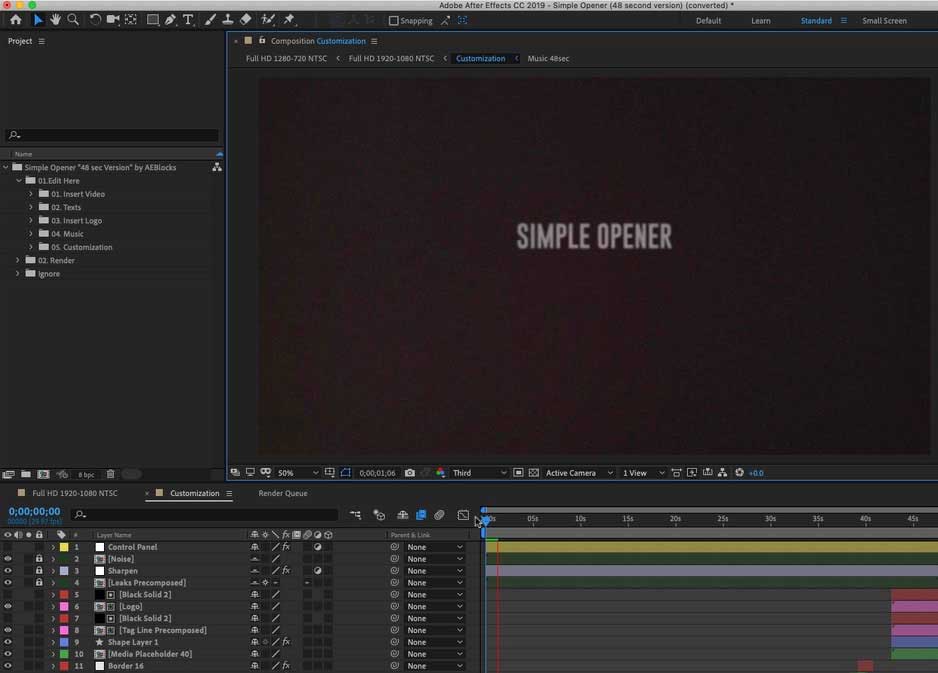
Play a preview of the project by pressing spacebar in After Effects. When you play the preview in After Effects, you’ll see a ton of placeholders fly across the screen. These placeholders need to be updated with our own assets to customize the intro.
It’s easiest if you round up all of your photos and video footage into a single folder then drop your photos and videos into the placeholders. I’ll be working with footage and images. Feel free to use the assets provided in the dropbox link above or work with your own assets.
4. Update the Intro Text
As you start to play the preview, you’ll see placeholder text titled “Simple Opener” along with a gritty texture. When the preview starts playing, pause it, then double click on the layer titled Text 01 Precomposed. This will open a composite layer, and you can type over the placeholder text with your own copy.
Switch back to the Customization composition and play a quick preview to see your customized text animation. That’s it! If you need to make a change, go back to the Text 01 Edit composition to do so.
5. Replace the Media Placeholders
As you play the preview, you’ll see placeholders within the project. After Effects makes it easy to update placeholders with our own files so that you can easily customize your project.

To update one of these placeholders, start by browsing the 01 Edit Here folder, then open 01 Insert Video, and finally Insert Media by Replacing Placeholders folder. When you get to this point in the folder tree, you’ll see all of the placeholder files.
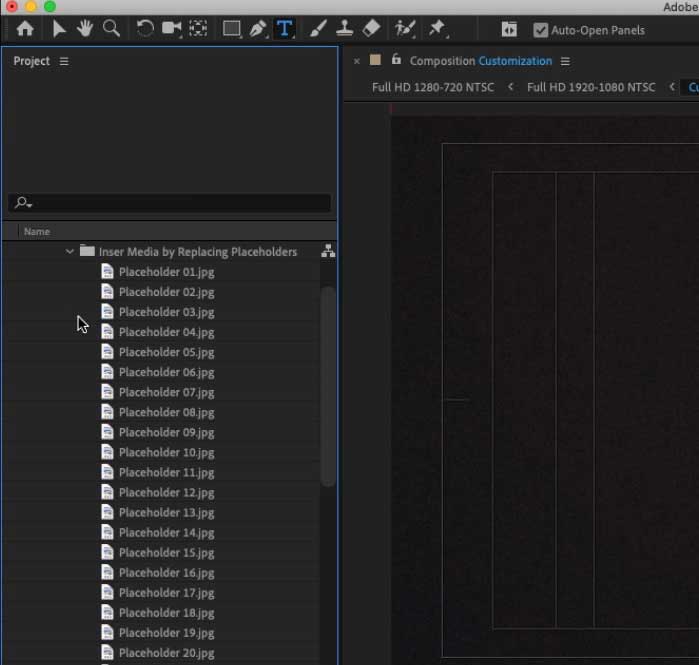
When you start to play the project, you’ll see placeholders fly across the canvas. Notice that each one has a number on top of the placeholder, and it matches to the placeholder of the same name in the project panel.
To replace the placeholders in the project, just right click on the filename in the project panel and choose Replace. Next, browse to the folder where your replacement assets are stored. Choose either an image or video file you’ve downloaded to drop it into the placeholder. Press play to see how your file looks in the project.
Doesn’t look quite right? You can adjust the size or scale of an asset by double-clicking on it. This will open in a composition where you can grab the corners to scale it down to fit the canvas and click and drag to reposition it. When you’re finished, go back to the Customization composition.
This is the bulk of the work on this project. Just continue to replace those placeholders in the composition until your project is completely customized.
6. Change the Project Length as Needed
By default, the Simple Opener is about 48 seconds long, but you don’t have to use the entire template. You can change the work area in After Effects to refine the portion of the video that will make the cut into the final composition.
For my example, I’m going to drag the handle for the work area to about the 30-second mark to change the project length. As you play the preview, you’ll see the entire project, but exporting the video will only render the selection in the work area.
You could also delete all of the clips that extend beyond the work area if you want to totally remove them. However, I prefer to leave those clips in case I want to make a longer version of the video later on.
7. Export the Finished Video
Right now, your intro video exists as an After Effects project that’s not exactly a finished video. You need to export your composition as a video file to upload or share it.
After Effects refers to exporting as rendering, and you’ll need to do it to get your final video file. You can render files directly in After Effects, or using the Adobe Media Encoder. In this example, I’ll export it using After Effects only by going to the File > Export > Add to Render Queue menu. File too big? Use a tool like Handbrake to compress your video footage.
With an intro like the one we created, you can capture your audience’s attention quickly without learning Adobe After Effects from scratch.


