
What is a Green Screen?
Green screens have been used in cinema for decades (going back as far as the 1930s), to create captivating and creative visual effects. In today’s world, almost every Hollywood movie leverages the green screen to bring ideas to life. So what exactly is a green screen, and why would someone want to use it in their videos or feature films?
A green screen is used in photos or videos to superimpose or ‘composite’ various images or footage together, often to create scenes that would otherwise be impossible to produce, like an action scene that takes place on the edge of a tall building. A green screen allows actors to perform dangerous-looking stunts in the safety of a controlled green screen studio. Later, during the editing process, the green screen is digitally removed or ‘keyed’ out so that another background, such as the top of a building can be stitched in, making it look like the actors were really there!
When done correctly, green screen effects can look completely seamless, and are often a major part of large video productions, as well as smaller budget video shoots. Odds are, there have been numerous films where you didn’t even know you were looking at a green screen composited scene!
But why green? The color green is used because it is the color that works best with skin tones, as green is furthest away from the tonality of skin. Sometimes, depending on what the actor is interacting with, required to wear, or when the actor needs to be very close to the background, a blue screen may be used instead of a green screen. Blue screens have much less color spill onto subjects making them better in certain situations, however, green screens require less light, and are generally easier to work with.
Green screen can save a production, or an individual a lot of money because they can simply ‘fake’ an environment and make it look like they’re at a beach on a hot summer day, when they’re really inside, at home in the middle of winter. There are definitely some cheesy looking green screen effects that don’t look real, but, with a bit of practice and knowledge, anyone can create a convincing green screen effect!
What Equipment do I Need to Create/Shoot a Green Screen Effect?
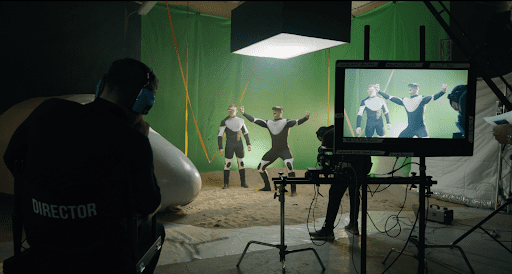
Green screens are versatile and are used on big and small budget projects; Hollywood film productions can have extremely complicated green screen setups, with several dozen high power film lights hanging from above, green objects, or even people dressed in green suits, as well as film sets that are a hundred feet long and 20 or 30 feet high! But even if you’re by yourself creating content for YouTube, and only have access to a living room, bedroom, or a small space, you can still create green screen videos!
There is a wide range of equipment available for green screen work, and it can be expensive, and overly complicated, but you can also make your green screen videos turn out well with just the basics and a little bit of know-how!
Here’s a list of the equipment you will need to create a green screen edited video:
The basics:
- A camera (This can be a smartphone such as an Android or iPhone, or a dedicated camera such as a mirrorless camera from Sony, Panasonic, Canon, etc.).
- A green screen (This can be a wall you’ve painted with chroma green, a chroma green paper backdrop, a chroma green cloth backdrop, or any material that has a solid and vibrant green color).
- A tripod or shelf/table to mount or sit your camera on.
- Light (Natural light from a window, or your home lights).
- A smartphone or computer to edit the green screen footage.
Bonus:
- Lighting equipment (This can be lights meant for video shoots, or various lamps, or work lights you have access to).
How do I Set Up a Green Screen?
Setting up a green screen is surprisingly easy, however, getting the final result to look good can be tricky, so here’s a step-by-step guide on setting up a green screen to ensure you’ll have the best chance while editing to complete the green screen effect.
Set up your green screen background by either painting your wall in chroma green, or by hanging a chroma green paper or cloth backdrop high up so that it covers the entire wall behind you. Many videographers use a backdrop stand system to hold up their green screen, however, it’s not needed. When I was first starting out creating videos and didn’t have much equipment, I pinched the green screen cloth in the tops of bedroom and closet doors; as long as you can find a way to hang the backdrop up, you’re good to go!
The next stage is to make sure the green screen is even in color, meaning that if you’re using a cloth backdrop, the wrinkles have been ironed out, or the fabric has been pulled tight on all sides, or if you’re using a painted wall, that it’s a solid, consistent color. Another option is to get a collapsible pop-up green screen; these have rigid edges that keep the green screen stretched across and wrinkle-free.
As mentioned, you can set up a green screen in almost any location, but the bigger the space, the better, as it will allow more separation between the subject and the background, which is helpful during the editing stage. Try to keep the subject at least a few feet away from the green screen backdrop to avoid any unwanted shadows. If you notice shadows being cast onto the backdrop, be sure to increase the amount of space between the subject and the green screen, or adjust the lighting, as shadows can cause problems when trying to key out the green screen.
Also, the subject on camera should not be wearing any color that’s green, as it will also be removed during the editing, which can have some unwanted and often funny results! For example, if you’re wearing a green shirt, it will literally key out your entire torso, along with the green screen in the background; you’ll be left with a floating head and hands – Probably not what you’re going for!
The light in the room should be bright, and even (This is important), so filming next to a big window will help, however, the best approach to getting a great green screen video is to control the lighting by setting up several lights, or you could film outside during the day when there’s lots of light. If you’re filming indoors, you should aim for placing a light on either side of the green screen, and then at least 1 more light in front of the subject directed at them. If you don’t own any lamps or film lights, your best bet is to set up your green screen outside on an overcast day where the sun’s light is being cast evenly.
In a basic green screen setup (Recommended when learning to work with green screens), set the camera on a tripod, or flat surface so that it doesn’t move.
Any camera can be used, and the settings aren’t very important, but as a general rule of thumb, try to film in manual mode with 24fps or 30fps and a higher shutter speed than you normally would film at to help reduce motion blur (Motion blur will make it more difficult to key out the green!). 1/100 or 1/250 shutter speed is good for green screen effects. Adjust the f/stop and ISO so that you expose the scene properly.
When the subject is on camera, make sure they stay within the boundaries of the green screen. If their hands, for example, leave the green screen area, it will be very difficult, and time-consuming to complete your effect.
How to Use a Green Screen Video to do Composite?
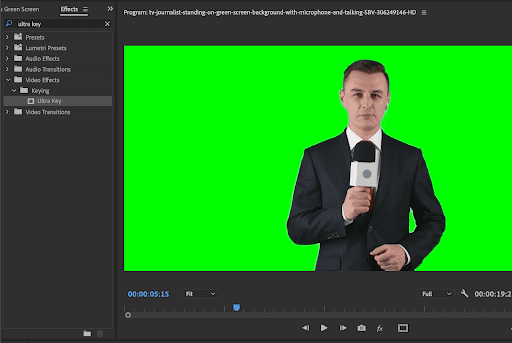
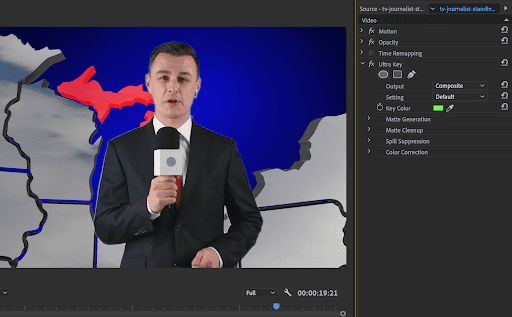
Almost every editing program will have a built-in way to edit green screen videos. Software Programs like Adobe Premiere Pro, DaVinci Resolve, Apple Final Cut, iMovie, and Adobe After Effects all have green screen removal effects. I prefer to edit videos with Adobe Premiere Pro, as well as Adobe After Effects. For simple green screen effects, Premiere Pro has an effect option called “Ultra Key” that will do a great job at removing the green screen in just a single click.
If the green screen video requires some advanced work, I would then import the footage into After Effects, and complete the video there, as Adobe After Effects is designed to handle complex visual effects whereas Video Editing applications like Premiere Pro are designed for cutting together clips and don’t specialize in visual effects compositing work.
If you’re working on a project where the person is talking to camera with a green screen behind, such as a news Anchor delivering the weather, this would most likely only require a simple approach to removing the green screen, and therefore, Premiere Pro or Final Cut would do a great job with the built-in keyer. However, if the scene you’re working on involves fast-paced action where the camera is moving and 3d tracking/compositing is required, you’ll want to do the work in Adobe After Effects.
Where can I Download Green Screen Backgrounds?
It is often very time-consuming (And even expensive) to film green screen videos because of the equipment, lighting, location, actors, or tight deadlines a project may have, however, thankfully, Storyblocks has you covered! You can find actors with green screen backdrops, animated characters on green screen, beautifully captured footage from different countries all around the world to add in the background of your green screen footage, or even pre-filmed footage with a green screen tv, smartphone, computer screen, or billboard that you can edit and composite with! The amount of creative videos you can create with the green screen options they have is limitless – Check out the link below to discover all of the options Storyblocks has to offer (There’s a lot!)


