Your video is done, and it’s time to show the world its glory. But before you can upload it to YouTube or TikTok, you have to render and export it. Rendering and exporting a project file is the final step in making your video. Exporting is the process of creating a file for your rendered video to be saved to, while rendering generates the final video from your raw project in Premiere.
Adobe Premiere features one of the most advanced sets of options to customize how you render your final video production. When you render a video in Adobe Premiere, you’ll have choices for formats, codecs, and more. Those settings will influence the quality and file size of the finished video, so it’s essential to get rendering right.
In this tutorial, I’ll walk you through how to render and export in Adobe Premiere. You’ll learn how to adjust key settings so that your final video file is the quality, size, and format you expect. Read on to find out how to choose those settings and get the most from your export or watch the video tutorial below.
Start the export
To start exporting in Adobe Premiere, go to the File > Export > Media menu. You’ll see a new window pop up with tons of settings you can choose to export your video.
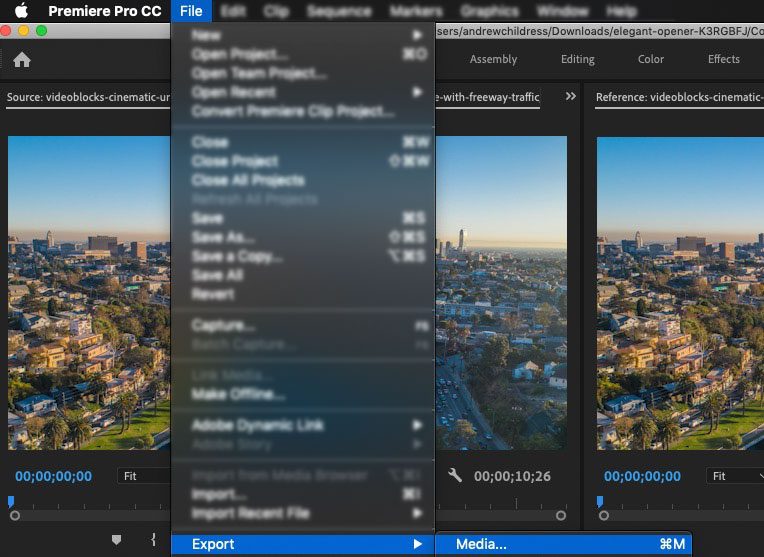
Navigate to File > Export > Media to start exporting your Adobe Premiere project.
This menu is where the power of Premiere’s rendering options live. You can change everything from the portion of the sequence you’ll export to the quality and codec settings in the finished file. Let’s learn more about tweaking these options so that your video comes out great.
Select what to export
While many tools require you to select what you want to export before you start rendering, Premiere’s export settings are flexible. The first setting that I recommend tweaking is selecting the portion of your video that you want to export. If you want to export the entire sequence from your project, you can skip this step. However, it’s good practice to scan through your video in that preview window to make sure your in and out points are where you intended.
To select a portion of the video to export, grab the handles below the preview and drag them to the start and endpoint of the video you want to use. The flag on the left side of the preview controls the starting point of the video, while the right flag controls the endpoint.
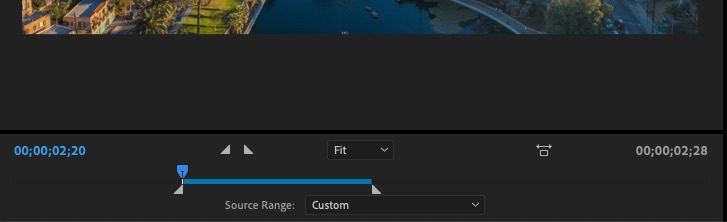
Set the flags below the preview to export a portion of your video project as needed.
After you’ve selected the portion of your video you want to export, it’s worth checking out the Source settings (upper left corner of this window.) You can draw a crop window on the part of the canvas you want to export. I like this option when you need to have a specific resolution for a particular platform. If you do not need to crop your resolution, you can leave the setting as-is.
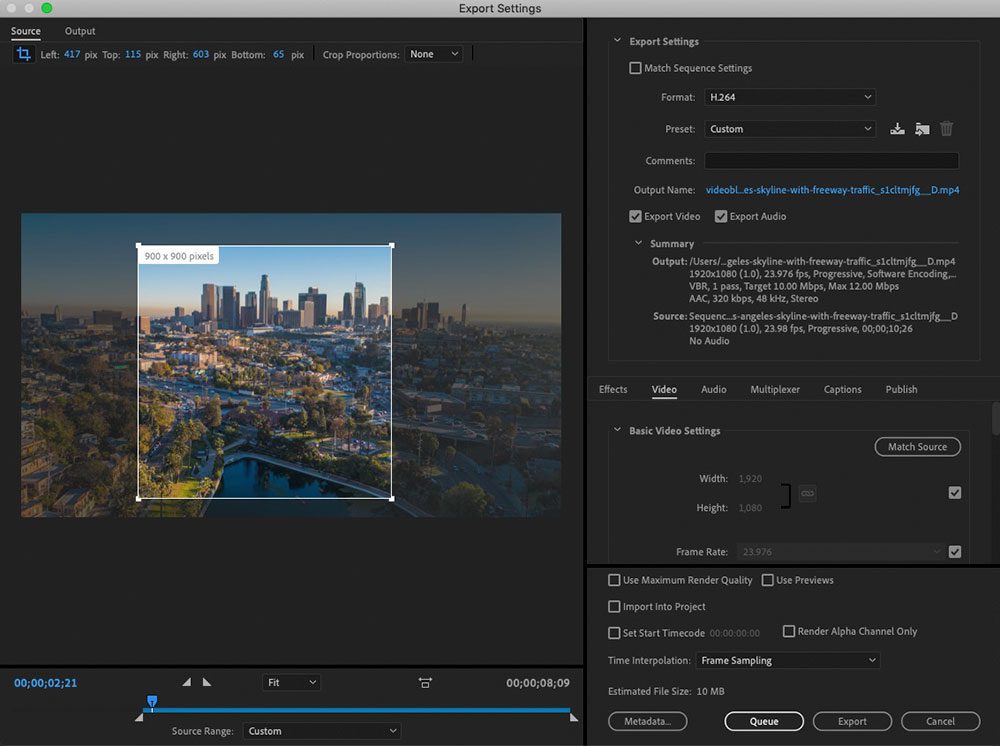
Draw the crop rectangle on your footage using the Source menu.
Set the video format and preset
Choosing a video format
Video formats are complicated, and there are many choices for how you export your video.
For this tutorial, I’m going to simplify this process. Usually, it’s great to choose the H.264 format because it helps address 90% of video export needs. This is a codec that’s compatible with so many devices and services that it’s typically the right choice. It does a great job compressing your video file while preserving the quality.
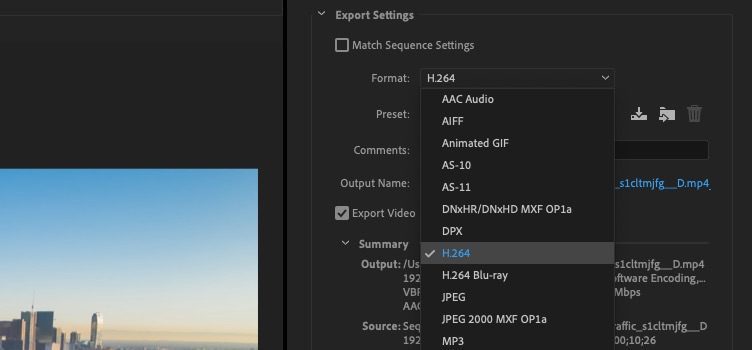
Choose a video format using the Format dropdown. H.264 is a good choice for most videos.
Times you may want to use another format is if you are not exporting for online upload (ex: your video will play on a large screen directly from the digital file) or if you know the service you’re sharing to has specific format requirements. If you just want to export audio, try out MP3 from the dropdown. There are also GIF settings if you’re going to create something lofi for social media.
Choosing a Preset
Now, it’s time to choose a Preset. This dropdown menu lets you select a resolution and quality setting. You’ll see a ton of options to apply to your export.
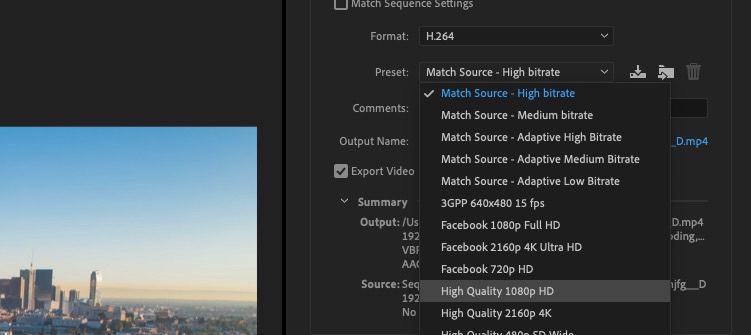
There are presets in the Adobe Premiere export window to choose the site destination or playback quality for your video.
Typically, I look for settings that match the platform or site that I’ll be uploading to. Adobe Premiere makes it really easy with all of its presets for YouTube, Vimeo, mobile, and more.
You can also tick the respective boxes to toggle Export Video and Export Audio if you want to exclude either from your finished file.
The most important thing to remember with this setting is that you don’t want to set the quality too high. For example, if your project resolution is 1280×800, exporting a finished video at 1080p may distort your footage, as the final file resolution will be 1920×1080 (larger than the footage in your project.)
Also, make sure to click on the Output Name to choose where you want to save the video file and how you want to name it. Click on Export and the render will begin.
How to render video in Premiere Pro
Regardless if you’re rendering clips, a sequence, or project file, all videos get rendered the same way in Premiere Pro. When you render your video, you’ll see the following options:
- Render effects in to out – This allows you to specifically render just the effects included in your project.
- Render in to out – This will render your project only between the in and out points you’ve set that we mentioned in the export section earlier. By default, it’ll render your entire project.
- Render selection – This will only render clip(s) or a section of your video that you’ve selected.
- Render audio – This will only render the audio of your project, and not the video.
Rendering is processor intensive, so if you have a more powerful processor, it will finish faster. But most likely, you’ll have to wait a bit. Longer videos and videos with more effects and elements will take longer to render.
Once your video finishes rendering, make sure to play the final video file and check for any errors or problems.
How to pre-render
Instead of exporting and then rendering your video, you can also choose to pre-render your project. If you’re working on a large project, editing in sections, or if you simply just want to be able to export your video quickly, pre-rendering is a great option. Once you’ve pre-rendered, you’ll see the color above your timeline change to yellow for the parts that you’ve rendered.
How to render faster
To speed up the rendering process in Premiere, there’s a few different steps you can take. That includes making sure your specs are up to date or choosing between optimizing rendering for performance vs memory. You can read more about how to render and work faster in Premiere in our dedicated article.
Learn how to do even more in Premiere
Rendering and exporting is that exciting part of the project when finally you get to see your finished product. Choosing the right export settings will make sure your video looks its best! If you’re new to editing in Premiere, we have a wide range of tutorials to help you get up to speed faster. Learn all about using adjustment layers, creating a motion blur effect, or explore our top transition templates for Premiere.
Premiere Pro templates help you easily and quickly add advanced effects or motion graphics into any of your projects. With a Storyblocks subscription, you can get unlimited downloads of royalty free templates, footage, music, sound effects, and more for an affordable price.
Editor’s Note: This post has been updated with additional information. It was originally posted on May 23, 2019.