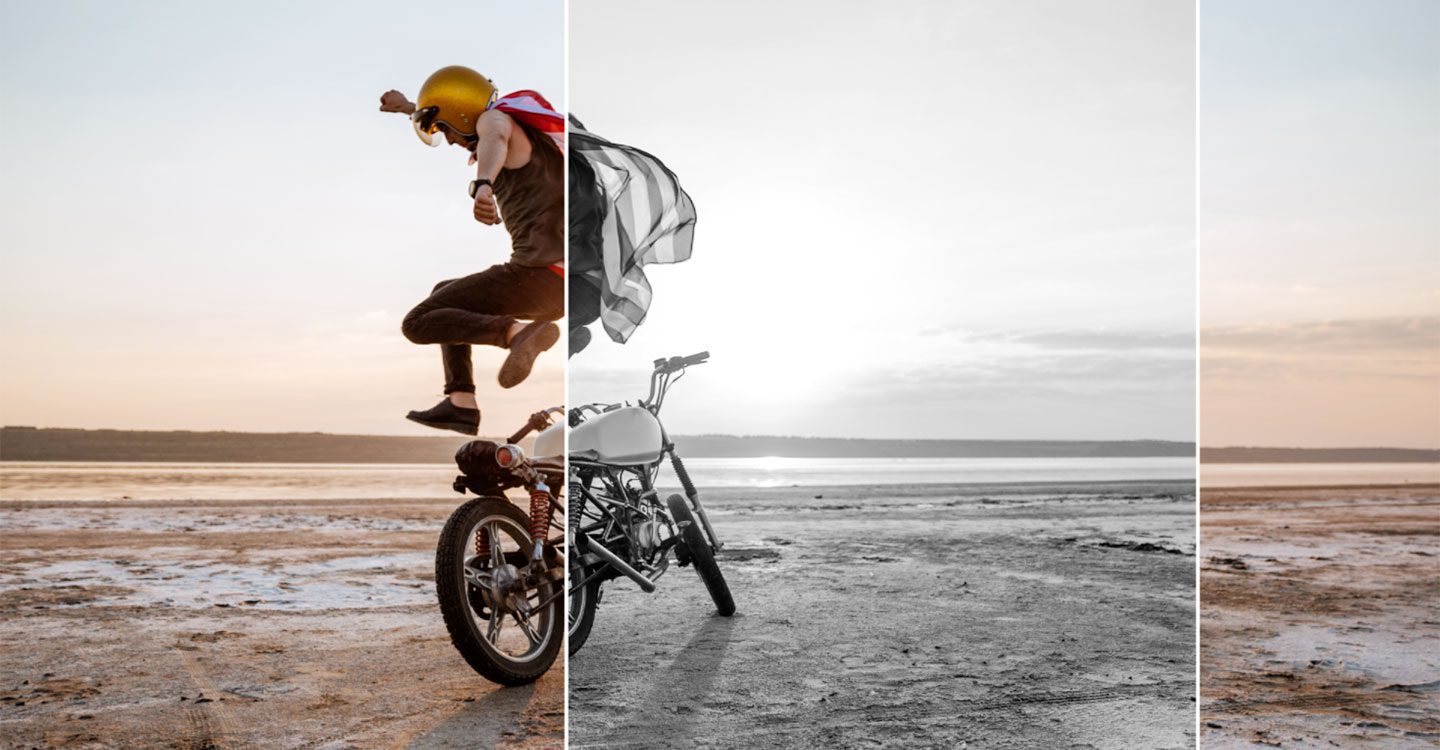
By Ryan Nau
Are you ready to take your After Effects know-how to the next level? From eye-catching logo reveals and title sequences to mesmerizing alpha channel animations, After Effects can really upgrade the production value of any project—even if you’re working on a shoestring budget. There are many how-tos out there teaching advanced tricks in AE—or for working with ready-made After Effects templates— but you might need a more comprehensive introduction to working with the program. That’s why we’ve put together this beginner’s guide for advanced tools and techniques in AE.
In this guide, we will cover 1) workspace layouts, 2) camera tracking, 3) 3D layers and lights, and 4) expression controls. Don’t have the time to read through? Not a problem. We’ve got you covered with a walkthrough video tutorial for each part.
Part One – Workspaces
- Adjusting Panels and Frames
- Adding a Panel to a Frame
- Separating Panels
- New Workspaces
- Name Your Workspace
- Choose Workspaces
- Delete Your Workspaces
- Discard Changes
Part Two – Camera Tracking
- The Viewer
- Tracking Types
- Stabilizing Motion
- Motion Track
- Making a Null Object
- Null Object Target
- Camera Tracking in CC15 & Above
- Create Camera
Part Three – 3D Layers & Lights
- Moving in 3D Space
- 3D Layer Order
- 3D Light Setup
- Light Testing</li
- Creating Shadows
- 3D Camera Setup
Part Four – Expression Controls
- Open Expression
- Text Area
- Wiggle Expression
- Expression Slider Controls
- Slider Controls
- Parenting Your Expression to the Slider
- Slider Code Control
- Wiggle Keyframes
- Links to Expressions
Part One – Workspaces
Visual learner? Watch the video tutorial instead —
Adjusting Panels and Frames
Everyone has their own specific layout that suits them best, so understanding what you want and how you want it to look is very important in achieving efficiency while working. If you place your mouse between the panels (1. + 2. in the picture), your cursor will change to a slide toggle and if you click and hold, you will have the ability to drag your panels around while resizing them, both vertically and horizontally.

Adding a Panel to a Frame
In the newer version of After Effects (CC15+) you have a workspace called Essentials. This workspaces places out all the necessary panels for you while giving you the ability to open and close each one independently. If you are using earlier versions of After Effects, can open specific panels and frames from your drop menu (windows) and select the panels you wish, you can click on the workspace (drop menu) and select pre-made workspaces or you can drag and drop panels from one section to the next. By taking your mouse, move over the Info panel, click and hold, and then drag it out onto the composition panel (Spot X in the image below). This will allow the info panel to be separated from the Audio and Preview Panel and become connected to the Composition panel.

Separating Panels
We can also separate a Panel from a Frame. To do this, you will need to grab the Info Panel and place it to the left, bottom or right side of the Composition Panel. This time the Panel will be placed between the Composition Panel and the Column of Panels it came from. Creating a new panel column. You can also create a floating panel by holding down the ALT Key and drag a panel out to make it float.
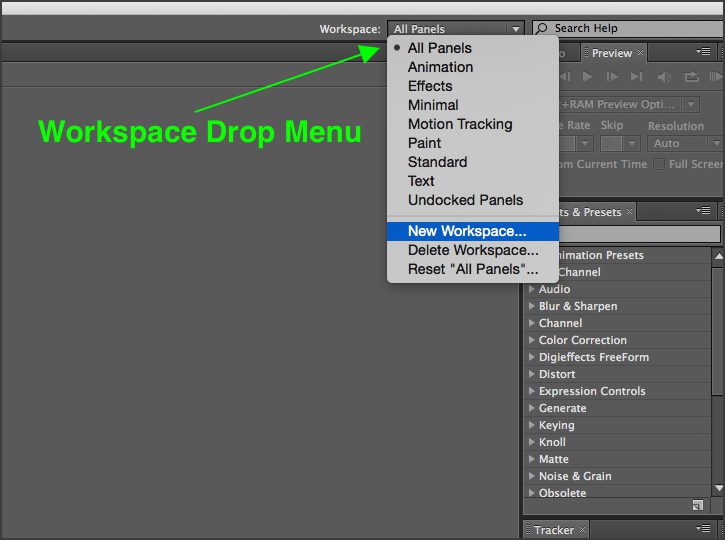
New Workspaces
After changing and creating the panels and frames we want, we are ready to save our Workspace as a reusable Workspace for other projects at a later date. In the same location that has the pre-made workspace drop-down, you can click the arrow, and then select New Workspace.
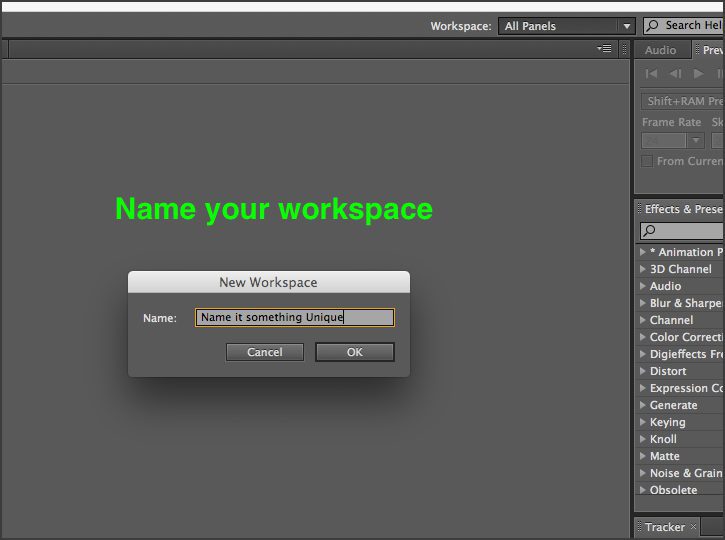
Name Your Workspace
You can call the workspace anything you want but if you have multiple workspaces or share a computer with a colleague whom also using After Effects, remember to name it something you will easily recognize.
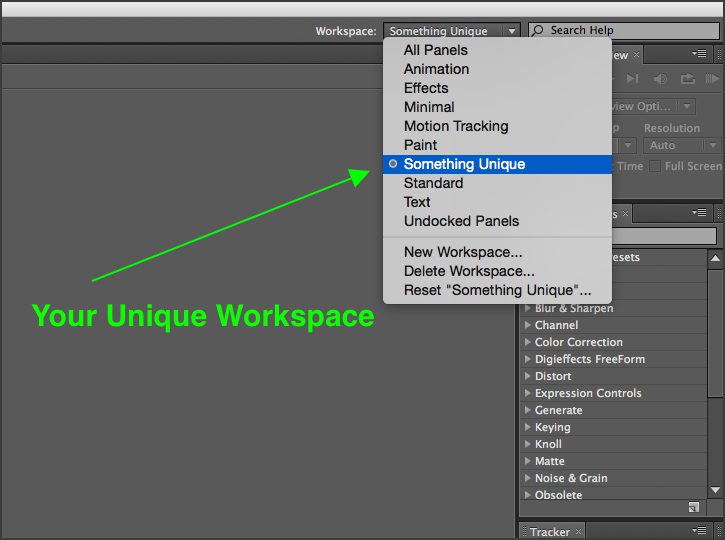
Choose Different Workspaces
Now that you have saved your Workspace you can select it at anytime. It is recommended that you try out some of the pre-made workspaces that After Effects has supplied because 9 times out of 10, there is one similar to the one you just made.
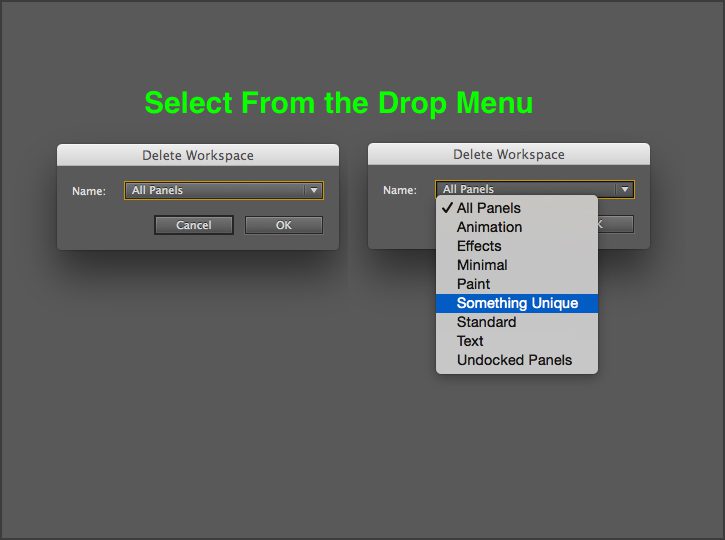
Delete Your Workspace
If you would like to delete your Workspace, make sure you first switch over to any Workspace other than the one you wish to delete. Simply go to the drop menu then go to Delete Workspace > Select Your Workspace > Delete Workspace.
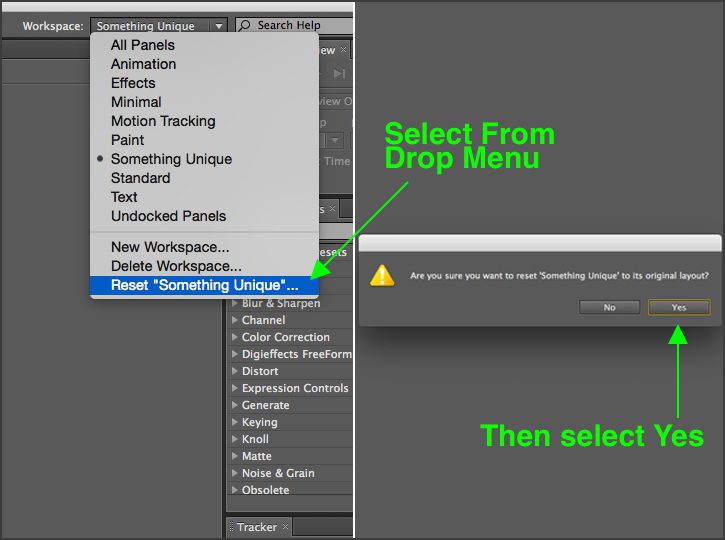
Discard Changes
Discarding changes sounds like something you may never use, however, if you have a friend, colleague or children who like to mess with your computer and programs, you actually might need this feature. If for example you left your desk for an hour to eat lunch or get a shower, you come back to see all your panels and frames all over the place, simply click on the Workspace drop menu and select Reset “My Workspace.” You will receive a popup that asks if you wish to discard all changes, select “Discard Changes” and your workspace will be right back the way it should be.
Part Two – Camera Tracking
Over reading? Watch the video tutorial —
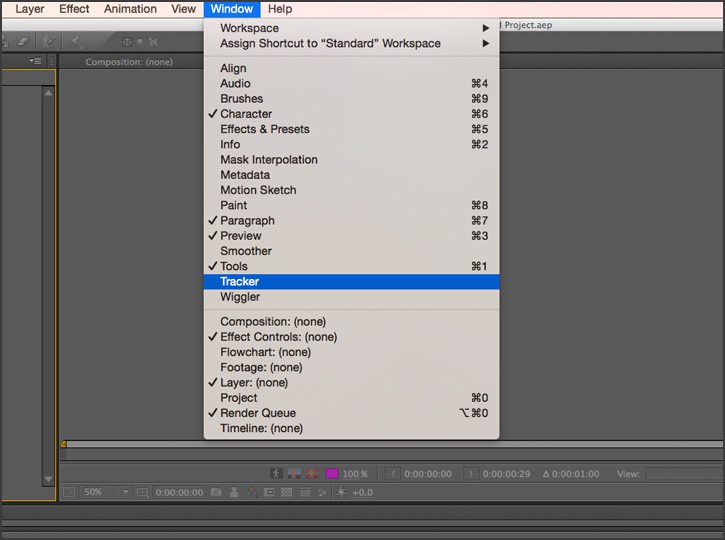
The name says it all. Camera tracking is a function that allows you to track the motion of an object or a specific place within footage frame by frame. After Effects makes this process pretty easy to learn. To start tracking a piece of footage we need to open the Tracker Panel. If you do not see the Tracker Panel go to Windows > Tracker and the panel will open on the right hand side for you.
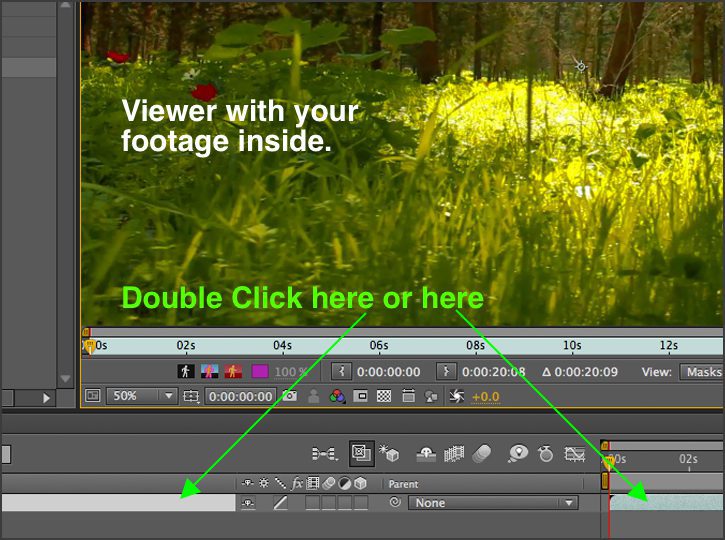
The Viewer
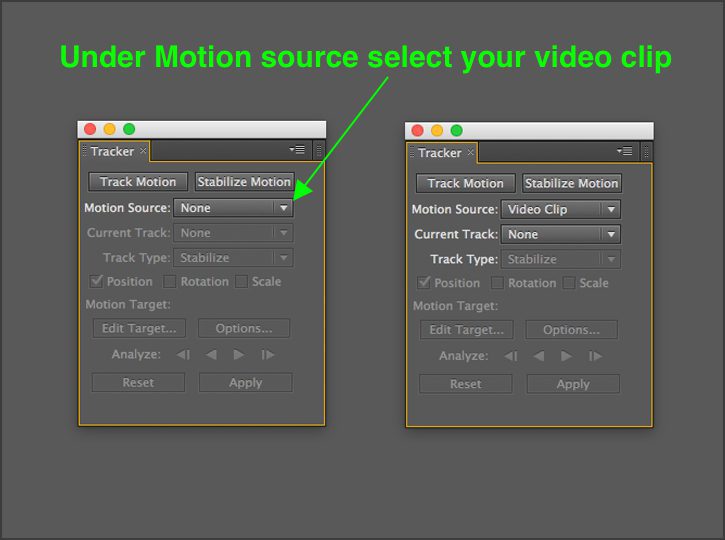
The Motion Source tab is set to none when you are in your composition panel. If you double click your video layer it will open it in the Viewer. Once you open it in your Viewer the Motion Source should automatically select the layer you opened in the viewer. You can also go to the Motion Source drop down menu and select the footage you want. When you do, the viewer window will open for the footage you selected.
Types of Motion Tracking
After you have selected your desired footage, we now need to track it. There are two types of motion tracking: Stabilizing Motion and Track Motion.
Stabilizing Motion
Using After Effects versions CS4 – CS6. Once you select Stabilizing Motion a Track Point will appear in the Viewer panel. This Track Point consists of an Inner Square and an Outer Square. Clicking on the Inner Square will allow you to move the Track Point around. This Inner Square is the area that After Effects will search for within each frame. The Outer Square is the search area. To assure that you are not out of place you must select a high contrast area so the search area is easier to track. When grabbing and sliding the Track Point around, it will zoom in for a better view.
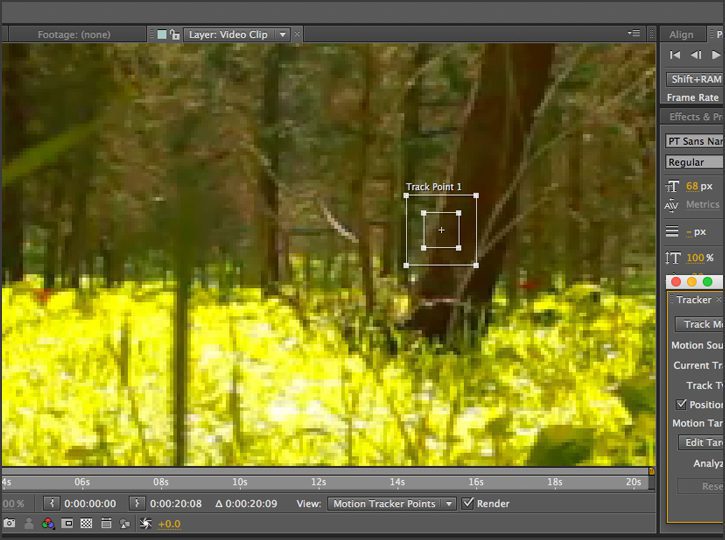

If you have any rotation in your footage you will want to enable the second Track Point to achieve a better effect. Click on the Rotation checkbox to open up the Second Track Point. Be sure to select a high contrast area again.
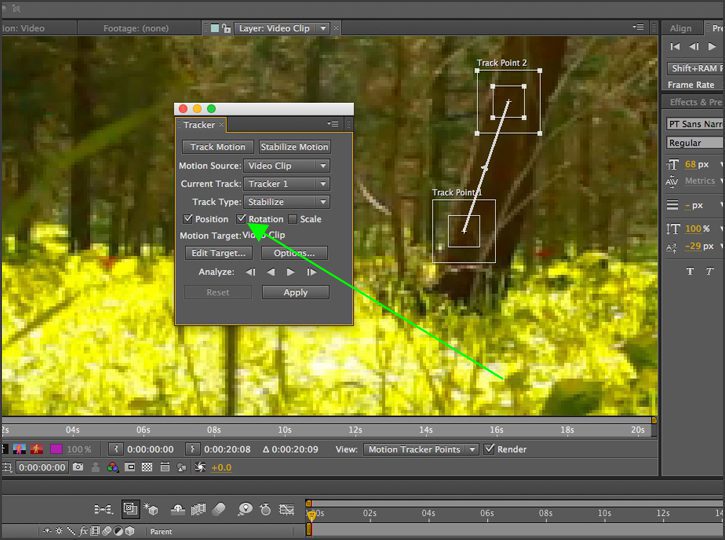
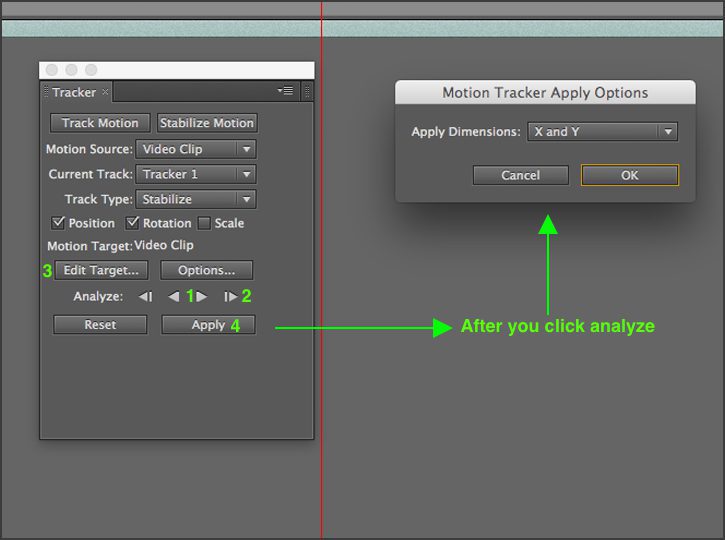
After you have your Track Points setup you are ready to analyze your footage. To perform the analyze process click on the (Analyze Forward button — 1. in the image below). You can also analyze your footage frame by frame by clicking (2. in the image) After Effect will analyze the footage and add specific information to the layer for each frame of the footage. Next select your Target (3. in the image) which is just the layer of your footage you want to Track and then click on Apply (4. in the image) The Motion Tracker Apply Options will appear on screen and you will need to select the Apply Dimensions, X and Y, then click on OK.
After you have applied the information to the layer, After Effects will generate numerous keyframes which will move the layer in X and Y direction to stabilize the footage. You may see a problem though. Since your footage is being moved left and right (X & Y) your background color of your composition will show through on the edges as your footage moves. To fix this, scale your footage layer up to extend past the edges of your composition or you can use a reflect effect if the footage is not too shaky.
Motion Track
The only real difference in choosing Motion Track is that the information won’t be applied to the same layer of your footage. For Motion Track we’ll need to create a new solid layer, which will receive our tracked information. To do this, click Edit Target > select the Solid Layer > hit OK and then Apply. Modifying everything else is the same as before.
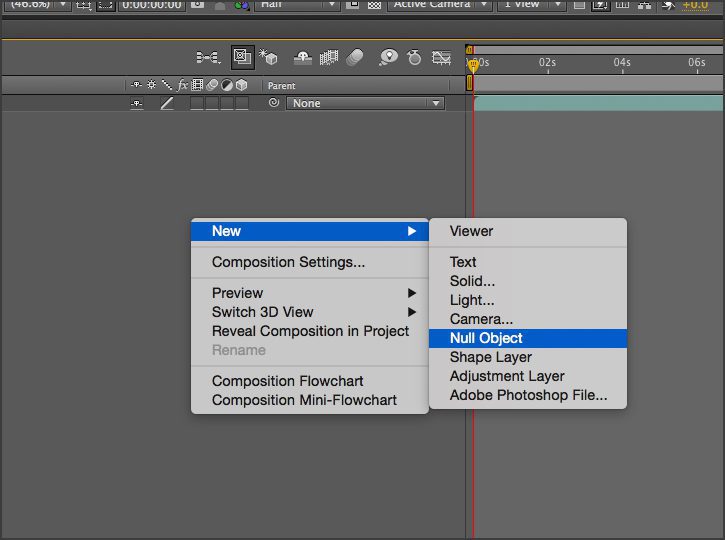
Making a Null Object
We now need to apply our tracked data from our layers to a Null Object. The Null Object doesn’t actually do anything but retain our tracking information. So, you can create a Null Object by right-clicking in a blank area inside the Timeline Panel, selecting New > Null Object or by going to Layer > New > Null Object.
Null Object Target
Now select Track Motion, track the footage and apply the information to the Null Object. You can do this by clicking on Edit Target > Select the Null Object > OK > Apply. Considering that the Null Object doesn’t do anything, you can turn its visibility off by checking the eye box off. It’s best practice to turn this off so the Null Object square that appears on screen doesn’t mess or interfere with our Motion Track square. Now you want to parent your layers to the Null Object. This will allow you to move any type of layer you want, text or logos freely and they will automatically follow the Null Objects motion within your footage.
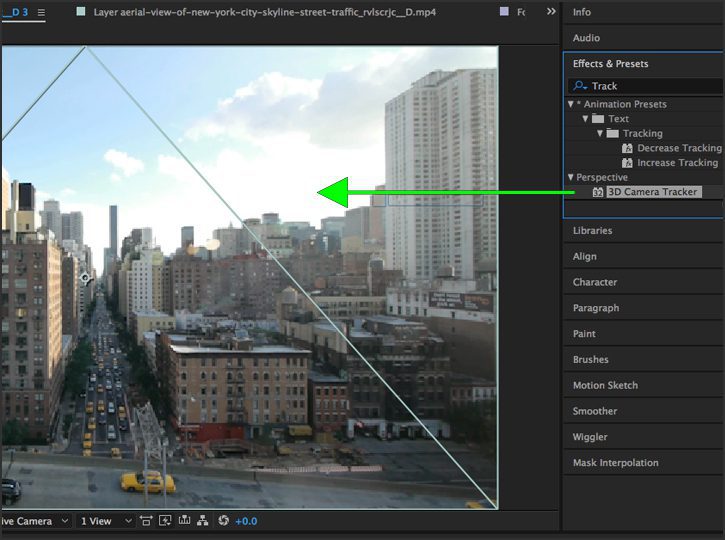
Camera Tracking in CC15 & Above
In the most recent versions of After Effects CC, Camera Tracking has become extremely easy. Let’s see how easy it is. First, make a new comp and drag in your footage file. Next in the Effects and Presets panel type in (Track) and then you will see 3D Camera Track pop-up. Make sure you’re in the composition viewport and not the viewer window and then drag your 3D Camera Track out onto the composition.
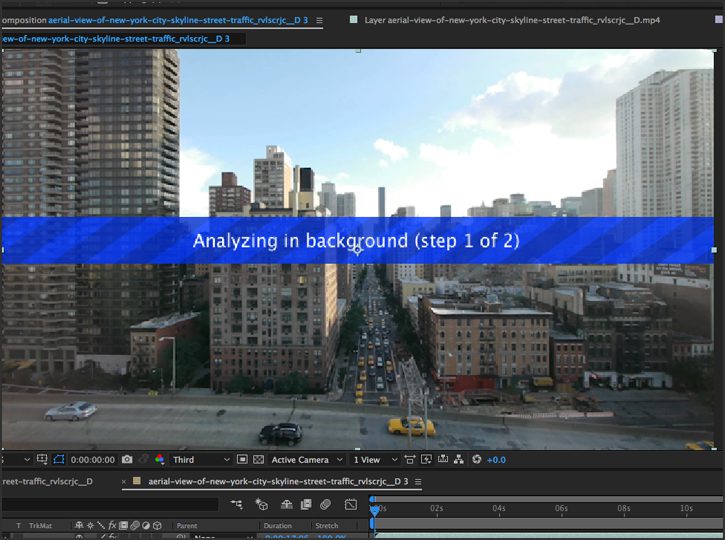
Immediately your footage will start to be analyzed. You will know it’s working when you see the step 1 prompt appear across your composition window.
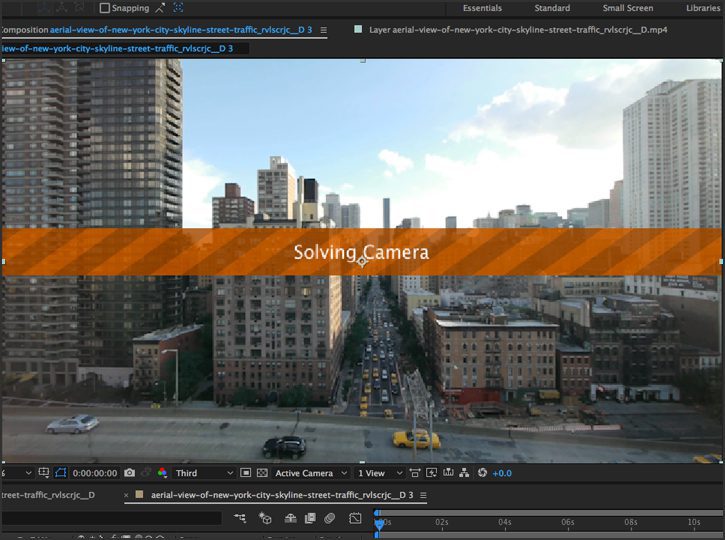
Next you will see the orange prompt (Solving Camera) appear. This process has a duration of 45 seconds up to 10 minutes of calculations depending on the speed of your machine and the length of your footage clip.
Create Camera
Now that your footage has been analyzed you will notice hundreds of colored dots or Track Positions covering your footage. Don’t worry, they won’t show up when it’s time to render, unless you want them too. If you do, you can click on (Render Track Points), for those of us who wish to not see them, keep the box unchecked. Now, to make this tracked footage worth something, let’s click on Create Camera and After Effects will build a camera to match the footage.
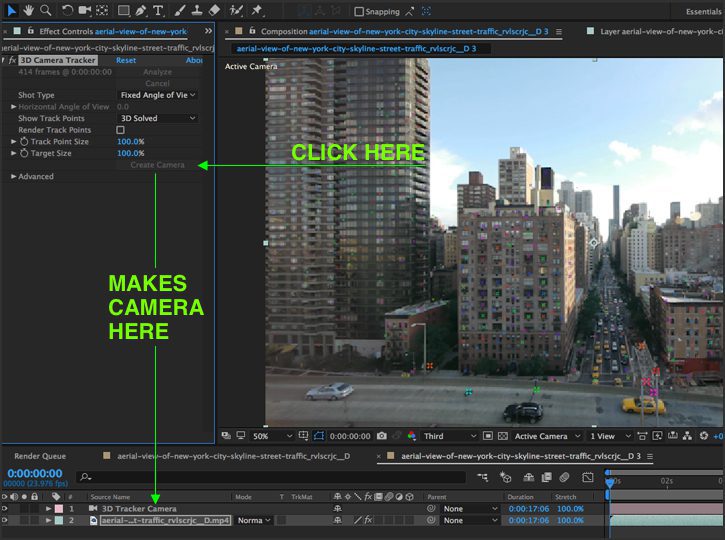
Now that you have a perfectly matched camera you can place in layers as 3D shapes, text or solids. Right away you will notice that your 3D layers are moving within your footage.
Part Three – 3D Layers & Lights
Want to watch the video tutorial instead? —
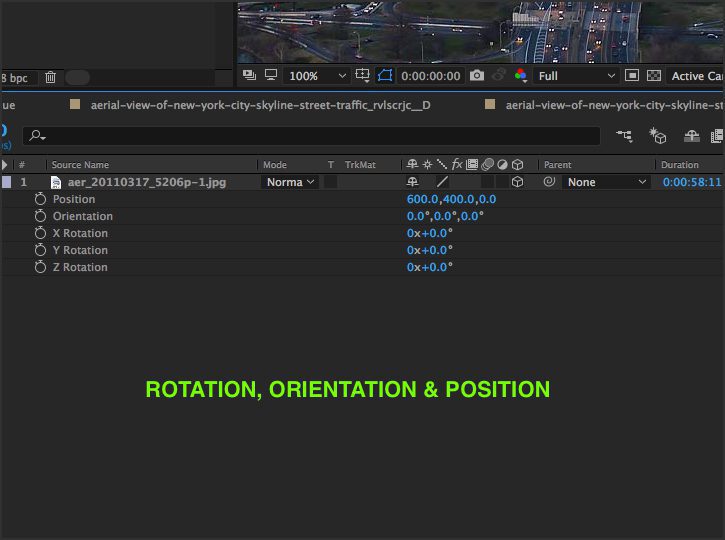
If you are familiar with Element 3D, great! We are not talking about that today. What we are talking about is setting up a 3-dimensional space which can only be created with applying the 3D switch for your layer(s) and setting up a Camera. To activate the 3D switch we need to check the 3D Box. Then hit the letter “P” for position to notice the new dimension we have added, the X,Y and now Z position.

Having a layer activated with 3D allows you to move the layer in 3 directions.
X = left, right
Y = up, down
Z = forward, backward
Moving in 3D Space
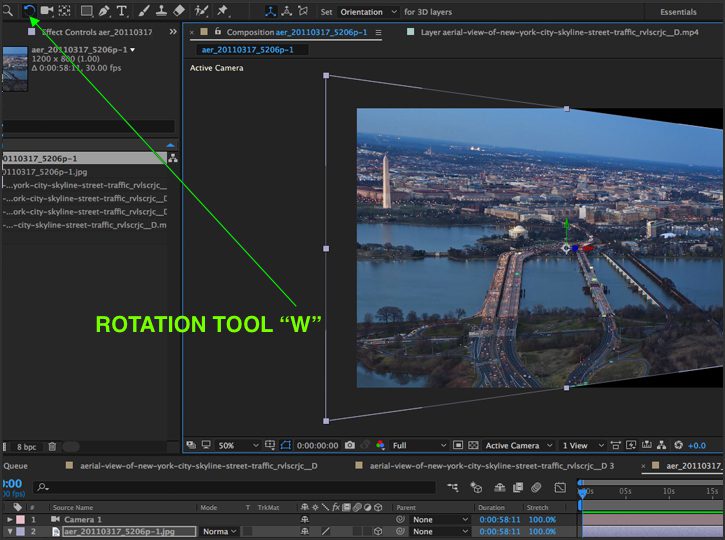
Once you have created a 3D layer have multiple control points for moving your layer around. Select your 3D layer and hit the “R” button, then hold shift and hit the “P” button. Now you have opened virtually all the points of movement you can work with. You have your rotation for each axis, X,Y & Z, and you have the orientation points for your layer.
Let’s just look at the Rotation options for now. We can change the values for X, Y & Z. When you do so you will notice that your layer is rotating around those axis points and not along them, like when you move the layer in 3D space. To pull up a quick rotation tool, click the “W” button, then place your cursor over on of the X, Y or Z arrows to rotate along that axis.
3D Layer Order
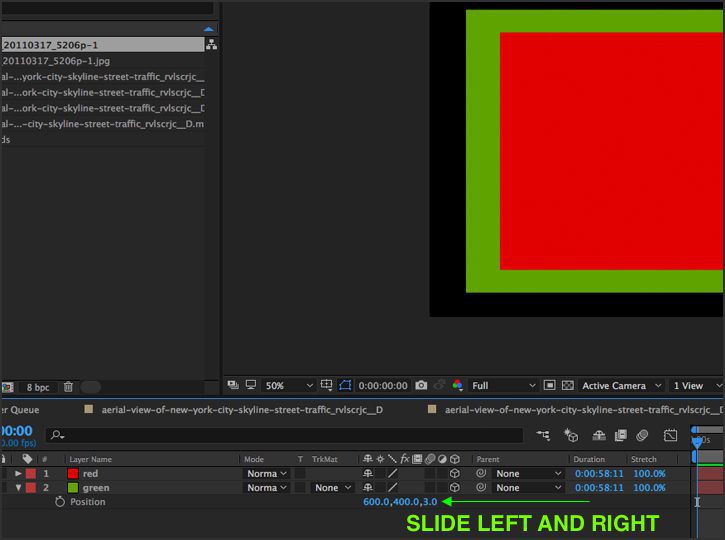
A very important thing you will need to know is stacking your 3D layers. Let’s setup a working example. Create 2 new solid layers in a new comp. Make one layer red and one layer green. Place the red layer above the green layer in your layer’s panel. If these two layers were not 3D layers, your bottom layer (green) would always be below the red layer. However, if they are 3D layers, the Z value determines if one is in front of the other. So, by clicking the 3D boxes for both green and red layers, take your green layer and hit “P”, then drag the Z position left and right until you see the layer pass in front of and go behind your red layer.
3D Lights Setup
Using 3D lights can make a for a more realistic look when dealing with flat 2D shape in a 3D space. Adding a 3D light can add the shadows and depth you miss when not dealing in true life settings. The 3D light can add highlights, shadows, and ambiance to your scene. Let’s experiment with setting up a light source. First, create a new composition and new solid layer. Make your solid layer white and check the 3D box. Now create a light by right-clicking in your layer panel > New > Light.
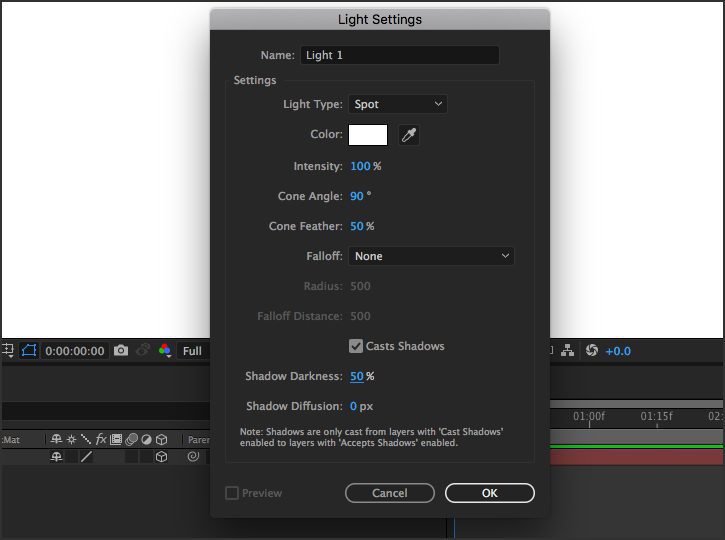
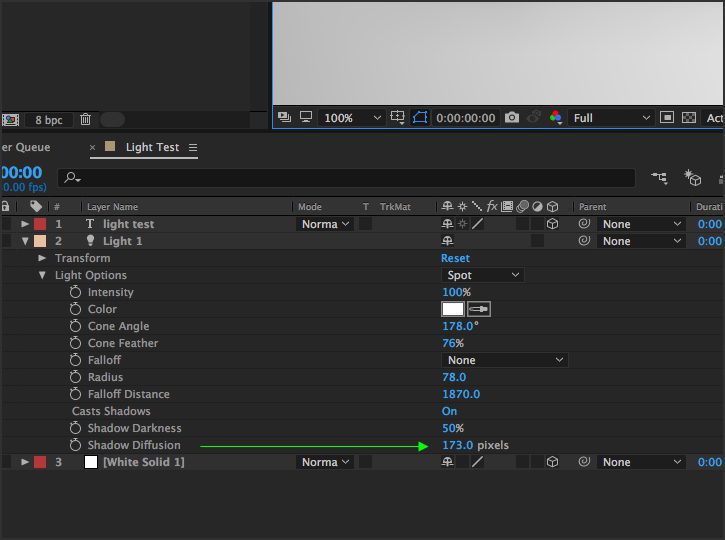
Once you click new light, a prompt will appear. You can create a few different lights that you can experiment with, for this though, let’s just use a Spot Light. Keep the color at white, intensity at 100% and turn Cast Shadows on, then change your shadow darkness to 50%.
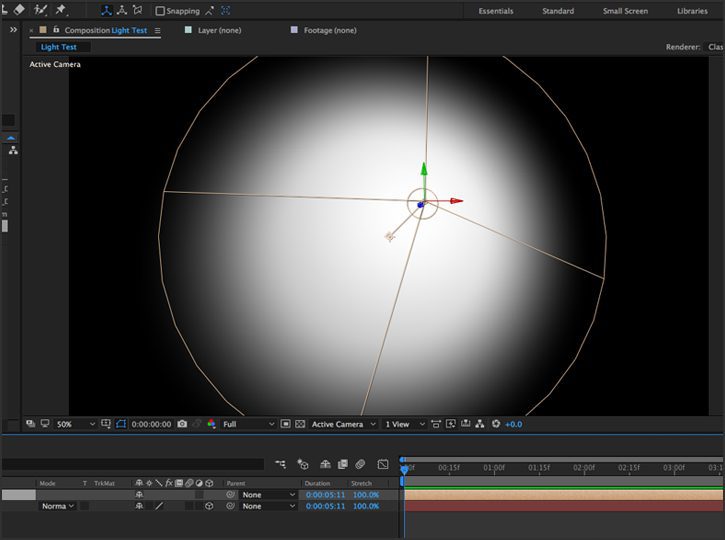
Light Testing
Since you have created a light source and have a 3D layer, you will automatically see the light has affected the layer. You will notice the falloff amount or gradation between the hotspot of the light’s cone to the original white layer, has become in shadow.
Now, if you drop down the properties of your light by click on the arrow to the left of the layer title, you can go into the lights options panel.
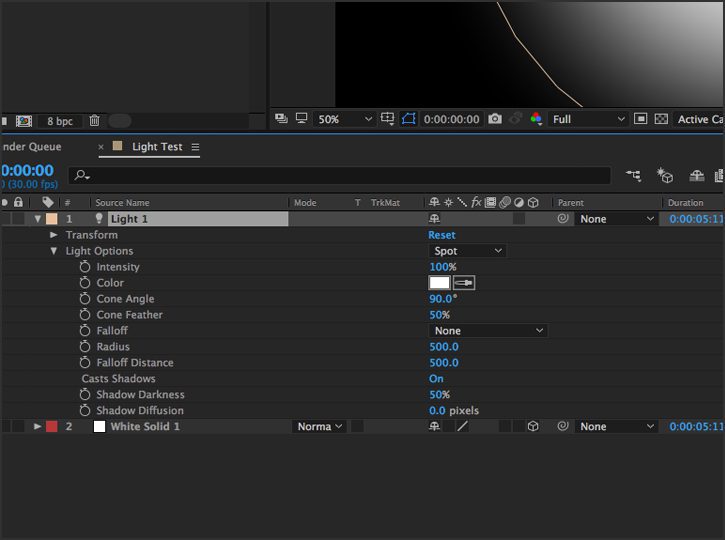
From here you can experiment with your lights properties, such as intensity, color, cone angle, cone feather, falloff type, radius and shadows.
Creating Good Shadows
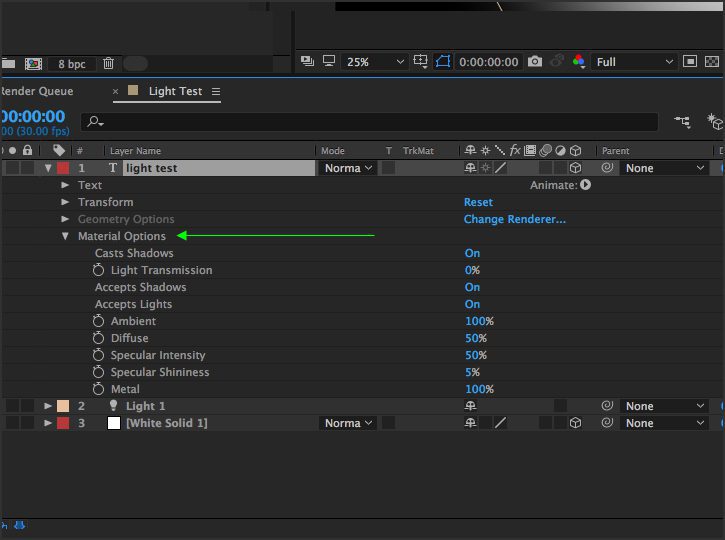
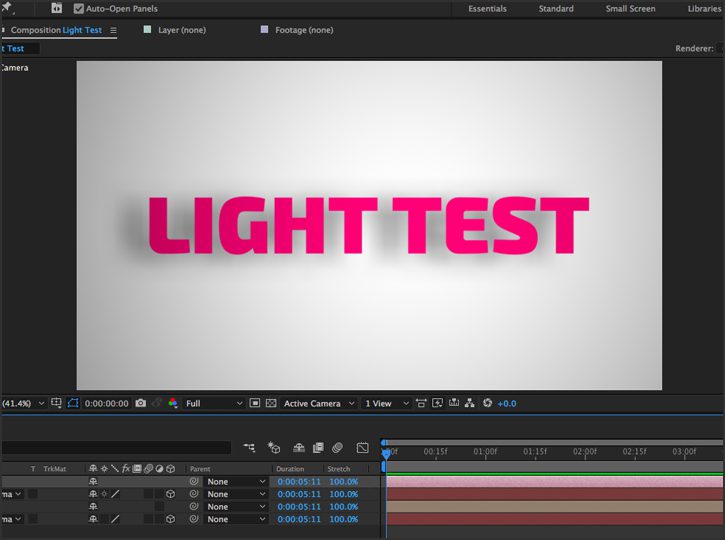
Now let’s add some text, you can double click on the text tool in your toolbar and then start typing on the screen. Type Light Test or anything you want. Next, align your text to be centered and then check the 3D box. Your text will probably disappear immediately after telling the layer to be 3D. This is because your white solid layer and your text layer are technically sharing the same Z plane space. You will need to move your text forward in Z space, so click your layer and hit the “P” button to pull up the positional transform properties. Now, click on the Z property and change your Z space to -500. You should see your text now with the light casting on it. However, there is not a shadow cast on the white solid layer. To have your text layer cast a shadow, drop down the transform controls on your text layer by clicking the left side arrow and open up the material options panel. You will see the first option is Casts Shadows, turn it to on.
Your text layer should be casting a shadow now on your white solid layer. Although it may not be the most realistic shadow, you can adjust the settings on your light to make it more believable. Start by going into the light options again and adjusting the shadow Diffusion level to something around 150-180 pixels. This will soften your shadows. The smaller the amount, the harder your shadow’s edges will appear.
Next, you can play with the position of your spotlight. You have two areas that you can adjust, your physical position of the light and the physical position of the target. Go ahead and move them around by clicking on them in the composition window or by moving them within the transform properties of your light layer.
Camera Setup
Once you have your shadow casting setup you can add in a camera to animate a small scene. First, before you set up the camera, you can scale your white solid up by 500%. This will keep your background from showing on the edges of your white solid if the camera moves too far in one direction. Create a camera by right-clicking inside the layer window and go > New > Camera and you will be prompted to select a camera type. For this experiment select the 35mm camera and hit OK. Immediately your scene will shift slightly because the camera is now the main viewport.
Although your image may not look exactly like mine, you’ll get the idea. Now, let’s open our camera transform settings by hitting the “P” button and then shift “A” button. You have now opened the camera’s physical position and the position of its focal point or (Position of Interest). Since we want the animation to stop here, with our text centered on the screen, drag your timeline out to 2 seconds and place a keyframe for both transform properties. Now, slide back to frame 1 and select the Track X, Y camera tool.
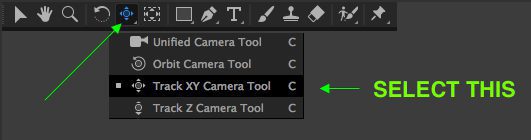
Once you have your Track XY Camera Tool selected and you are at frame 1, by placing your mouse on the screen and holding down shift, you can slide left or right to move both the camera and the point of interest together. You should now see a new keyframe for both transform properties appear in your timeline. You can now preview your animation and watch how the camera, 3D text layer and light all function together to give you a realistic scene.
There are many other options in the same drop-down menu as the Track XY camera tool that you can use to move your camera around in 3D space, so go ahead and try them all.
Part Four – Expression Controls
You can watch me walk through this as well —
Expression is the script language of After Effects, which allows components of your movie to be controlled/animated by typing in a script language specific to that control point. Using expressions and expression controls can establish complex animations, movements or randomness to your layers without you having to manually set keyframes. Once you have learned some of the basic techniques for using expressions you’ll ask yourself, how was I not using expressions before? Let’s create a new composition and a new solid. Hit the letter “T” to pull up the Opacity control.
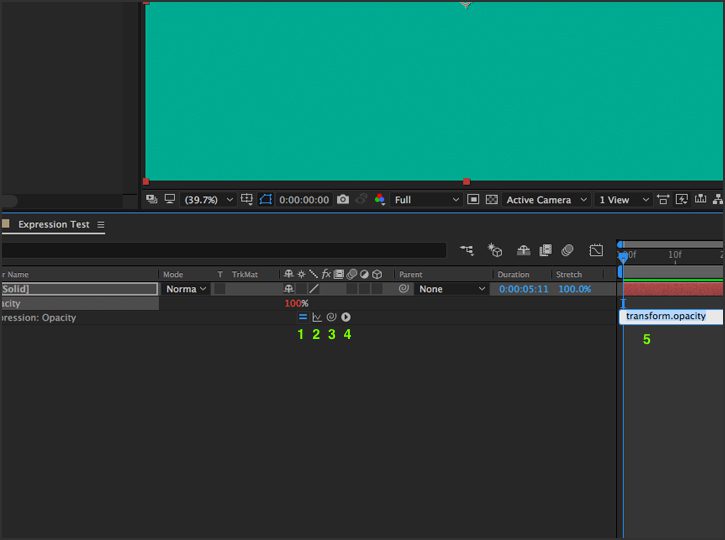
Open Expression
To open-up your Expression field, Alt-click on the stopwatch next to the word opacity. After Effects will open a text area where we can now type in a programmed expression that After Effects can read. It will also open-up four options for your expression. Each of these options can be enabled and disabled depending on if you need them or not.
- Switches the expression on or off, but the expression in the text area will remain.
- A Diagram that offers more control when needed.
- Pick-Whip tool which is great for creating Universal Expressions.
- Opens a palette of expressions that you can use if you understand what they do.
Text Area
Now place your cursor inside the text area and type 50, hit return. You have just placed the value of your Opacity to 50 or 50%. You can create mathematical formulas and have After Effects calculate them for you. For instance, if you place 25+75 and hit enter, what happens?
Wiggle Expression
Now that you know how to type in an expression, try copying and pasting this expression into your text area: wiggle (25,50) and see what happens. The first value inside the parenthesis (25) is your frequency, or how many times the opacity will change in 1 second. The next value (50) is the amount it will change during that 1 second. The 50 is the max value, so the opacity will never jump by more than 50% during the duration of the solid showing on screen.
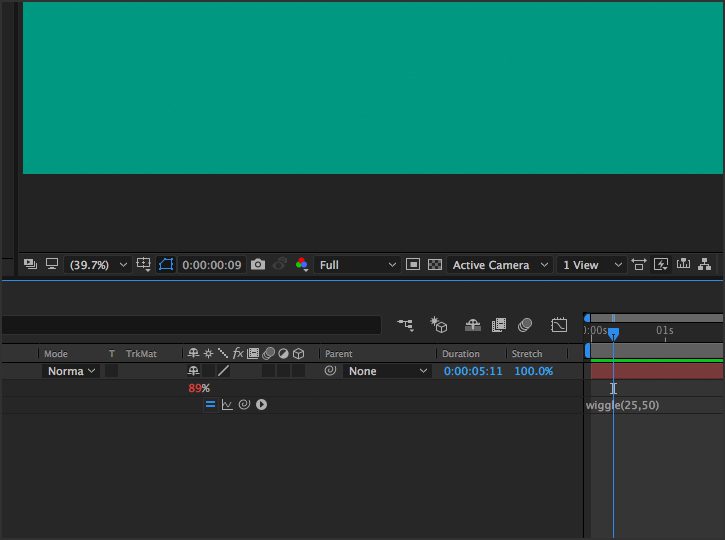
You can see in the 9th frame, the opacity has jumped to 89%. Now try changing up the value of your frequency to 100 and see what happens. Try changing your amount to 10. By adjusting these values, you can make very compelling effects, that are calculated by more random/natural formulaic expressions.
Expression Slider Controls
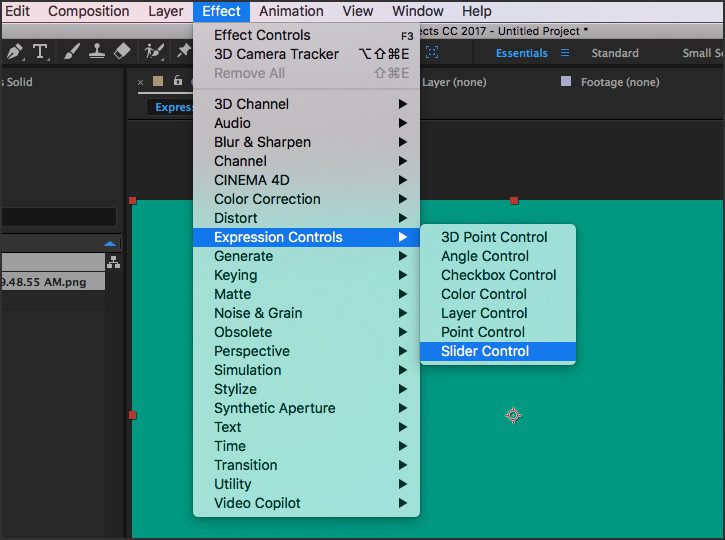
Sometimes you may only need an expression to be active for a few short seconds. If that’s the case, you will be glad to know, After Effects has a way you can control your expressions with simple sliders. First, go to Effects > Expression Controls > Slider Control, to apply the Effect to our Layer with the Expression.
Slider Controls
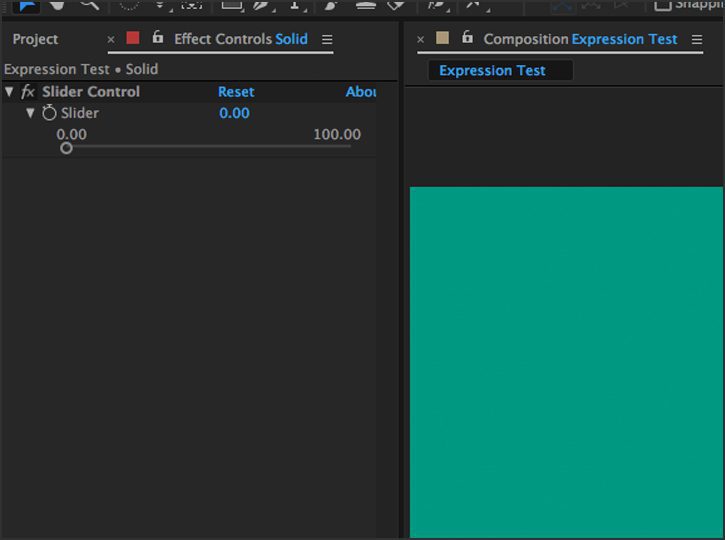
Now that your slider has appeared in the Effects Control Panel, there is a single slider with 2 values 0 or 100.
Parenting Your Expression to the Slider
Now that your slider is ready for use, go to your expression text area and highlight the amount (second value) and delete it, but make sure not to delete the comma that separated the two values. Next, while keeping your cursor text icon where the value was you just deleted, go over and drag your Pick-Whip tool up and connect it to the word slider with the stopwatch next to it. You have now successfully setup an expression slider.

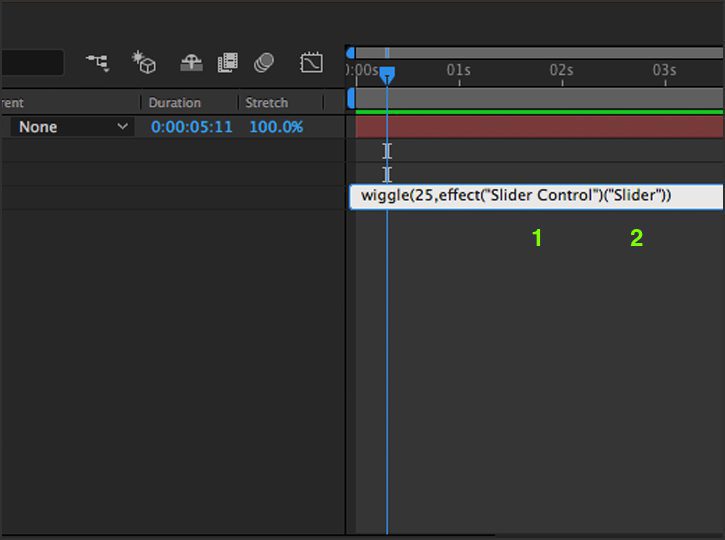
Slider Code Control
After connecting that value to the slider your expression text box will look a little different. Let’s look at the code and prepare the animation for our slider. Inside the expression text area, you will have two areas now (1. in the image below) slider control and (2. in the image below) slider amount.
We can click on the stopwatch in the Effect Controls Panel next to slider or we can hit the triangle on Effects inside our layers panel to pull up the slider control and click on the stopwatch there. This will create a keyframe at frame 1 of our animation.

Wiggle Keyframes
With the Slider value set to move forward 30 frames. Set the slider to 50 and then move forward another 30 frames and add another keyframe at 50. Now move forward another 30 frames and set the slider back to 0. You should now have a wiggle animation that starts at no wiggle, goes to a wiggle for a few seconds and then goes back to no wiggle.
Links to Expressions
There are plenty of websites out there that offer great expression formulas for effects such as bounce, inertia, and swing. You can always check out the Help File of After Effects and their website for more information. Below are a few other websites that offer free expressions.
Ryan Nau is an After Effects hero and long-time Storyblocks contributor. Check out his portfolio of After Effects templates.


