
Don’t you hate it when you’re cutting music and the audio comes to a sudden stop—like you’re falling off a cliff? Unfortunately, this happens all the time to beginner filmmakers and sound designers. You can’t just chop up a music track like you can with video. This kind of precision editing takes knowledge, practice, and a little bit of rhythm. Luckily for you, we have the knowledge and practice parts covered—you’ll have to find the rhythm from within. This post covers three techniques that you can use to make any song fit your project. For this tutorial we used Adobe Audition, but you can use these concepts in any editor.
If you’re looking for some music to cut and rearrange for practice, then check out our library of royalty free music.
Fade In and Out
Rather than falling off that metaphorical cliff we mentioned earlier, wouldn’t it be better to gradually slide down it? A fade is like a slide that prevents any abrupt and harsh stops, and is a much more pleasant transition than a hard cut. If the music track is too long for your video, you can just cut it and add a fade. This technique is by far the simplest, but should really only be used as a last resort as it doesn’t exactly scream professional sound design. However, it’s still important to know when and how to use fades when cutting music, so follow the steps below to learn more.
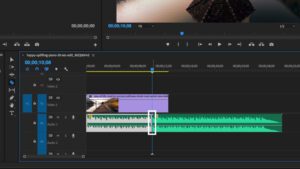
Step 1: Cut the audio track to match the length of the video
Step 2: Create two points on the white line in the middle of the track
Step 3: Drag down on the second point to create a fade
Cut to the Beat
For the second technique, you have to find your inner musician because cutting music isn’t as easy as it seems. One wrong cut and everything will be off beat. There are certain places to cut in a musical piece, and you have to find the rhythm to find the right cut. Luckily, music almost always follows a pattern. You have to listen closely to the beat and tap along with it. It helps to count aloud too. You’ll find that cutting on a tap—or a downbeat—will almost always lead to a seamless transition. You should also be aware of chord progressions if the track has any. It’s best to cut on beat at the end of a chord progression so it isn’t interrupted.
Cutting music to the beat is a great way to shorten a song while still making it sound natural. Most songs typically have a distinct ending–whether it’s a long sustained note or a drum kick with some reverb. However, the song may end minutes after your video does, making it useless. But if you follow the steps below, then you can learn how to cut music properly and make the natural ending come in much earlier.
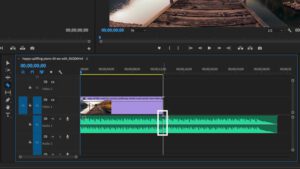
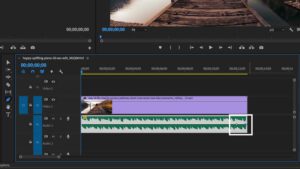
Step 1: Find the proper beat to cut on
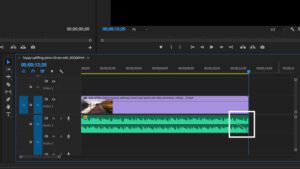
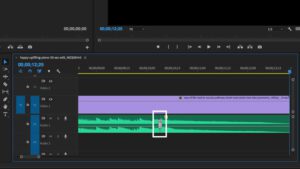
Step 2: Cut on beat right before the song’s natural end
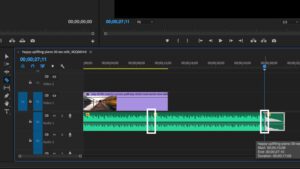
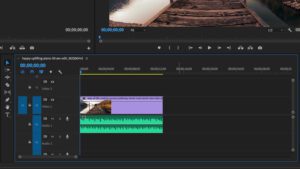
Step 3: Join the two cuts and add a short crossfade
Add Reverb
Instead of cutting to the end of a song, why not make your own ending? Adding reverb lets you do just that, and all it takes is one cut and one sound effect. With this technique, you can make a beat or note ring out to make it seem like a natural end to a song. So you don’t have to rearrange the track like a puzzle. However, to get the most out of the reverb, it helps to take the music track into Adobe Audition for more precise sound editing. This may seem scary for beginners, but these steps will walk you through the process.
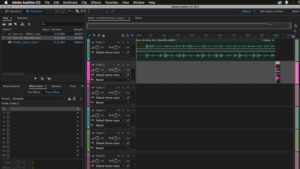
Step 1: In the multitrack editor, cut the song where you want it to end
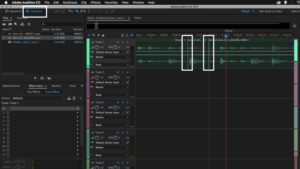
Step 2: Drag the new ending to the next track below and highlight it
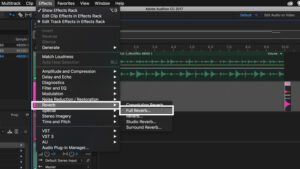
Step 3: Go to Effects tab, select Reverb, and then select Full Reverb
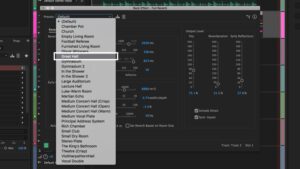
Step 4: Go to Presets and select Great Hall
Now that you know these techniques for cutting music, you can combine all of them and make any music track your own. If you want to expand your sound design knowledge then check out our blog post about bumpers and stingers.


